Step-by-Step: How to Set Up Your First Dirted Tank (Walstad Guide
4 min readStep 1: Choose the Right Tank and Location
Select an aquarium that fits your space and is suitable for a planted tank (even a small tank will work, but around 5–10 gallons is a nice beginner size). Place the tank on a sturdy, level surface away from direct sunlight (to prevent overheating and algae growth). Make sure to rinse out the tank with water (no soap) if it’s new or has been in storage, to remove any dust. Having all your materials ready (soil, sand/gravel, plants, water conditioner, etc.) before you begin will make the setup smoother.
Step 2: Add the Organic Soil and Sand Cap
Begin by adding a layer of organic potting soil to the bottom of the empty tank. Aim for roughly about 1 inch (2–3 cm) of soil or a bit less – you don’t need a thick layer for your first dirted tank. Important: use soil that has no added fertilizers or pesticides (check the bag for “unfertilized” or purely organic soil). Regular potting mix often contains additives that can leach ammonia or other chemicals which may harm fish or shrimp. Spread the soil evenly across the tank base, but don’t compress it too much. You can pick out any large wood chips or debris in the soil (or sift it beforehand) to prevent floating bits and excess decay.
Next, gently add your inert cap material on top of the soil layer. This can be clean sand (play sand or pool filter sand works well) or a fine gravel. Add about 1–2 inches of this material, completely covering the soil. The cap should be considerably thicker than the soil layer beneath (about two to three times the soil depth) so that the dirt stays down and won’t be stirred into the water. This sand/gravel layer keeps the nutrient-rich soil in place and prevents it from clouding the water. It’s a good idea to add the sand or gravel slowly using a cup or scoop, so you don’t disturb the soil too much. Once the soil is capped, you can lightly mist or sprinkle some water over the substrate to dampen it – this helps settle the layers, eliminate air pockets, and makes planting easier.
Step 3: Plant Heavily and Decorate (Before Filling)
Now it’s time to add your plants before you fill the tank with water. Planting in a dry (or slightly damp) tank is much easier and prevents the soil layer from getting stirred up. Place the roots of your plants into the soil layer through the sand cap, and pack the tank full of greenery. You can also add any hardscape elements (like driftwood or rocks) at this stage if you want to decorate the tank’s layout. Focus on covering as much of the substrate as possible with plants – the mantra of the Walstad method is to plant very densely right from the start.
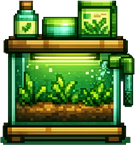
A fully planted Walstad-style dirted tank with a sand cap and thriving aquatic plants. The nutrient-rich soil beneath the sand feeds the plants, and in return the dense plant growth helps keep the water clean and safe for animals like shrimp. Heavy planting from the beginning ensures that algae have a hard time gaining a foothold, since the plants soak up most of the nutrients
Choose a variety of fast-growing, easy aquatic plants for your dirted tank. Hardy species like hornwort, guppy grass, water wisteria, or floating plants (e.g. duckweed, water lettuce) are ideal because they grow quickly and absorb lots of nutrients. The abundance of plants will act as a natural filter – their roots will draw nutrients from the soil and their leaves will consume ammonia and other wastes, creating a safe environment for your fish or shrimp. By planting heavily, you also starve out algae by leaving very little nutrients in the water for it to use. Don’t worry about exact placement or making it look perfect right now; the plants will grow and fill in the space over time. The key is simply to pack the tank with plants at the start for the best balance.
Step 4: Fill the Tank Gently and Kickstart the Cycle
With the substrate and plants in place, you can begin filling the aquarium with water. Pour very slowly and carefully to avoid disturbing your soil and sand layers. One handy trick is to place a plate, bowl, or plastic bag on top of the sand and pour the water onto that, so the water spreads out gently instead of jetting directly into the substrate. Use dechlorinated (conditioned) water only – this protects your plants’ delicate roots and the beneficial bacteria that will colonize the soil. Fill the tank gradually all the way up. If you notice any bits of soil floating, you can skim them off, but a properly thick cap should minimize this.
After the tank is filled, double-check that your heater (if used) and any equipment are installed, but hold off on adding any fish or shrimp immediately. It’s best to let your new dirted tank sit and cycle for a few weeks before introducing animals. The Walstad method’s heavy planting will help the tank stabilize faster, but you still need time for beneficial bacteria to establish in the substrate and water. These bacteria will convert toxic ammonia from the soil and plant decay into nitrite and then into nitrate, making the water safe for livestock. Even if the water looks clear, invisible toxins can be present initially. Be patient and give the tank about 4–6 weeks to fully “mature.” (In many cases you might see ammonia and nitrite levels drop to zero in around 4 weeks, but timeline can vary.) During this period, you can run a gentle filter or air stone if you wish, or just let the plants do the work. Once testing shows the tank is cycled – ammonia and nitrite at 0, nitrate accumulating – you can start gradually adding a few small fish or shrimp to enjoy your new natural planted tank.
To remember
- Soil Selection: Stick to plain organic potting soil with no fertilizers or pesticides added. Avoid “enriched” or chemically fertilized soils, as these can release harmful substances into the water
- Cap Thickness: Make the sand/fine gravel cap significantly thicker than the soil layer (roughly 2–3× the soil depth). A deep cap keeps the dirt from escaping or clouding the tank water
- Pre-soak the Soil: Before adding the sand cap, you can wet down the soil layer (or even soak and drain the soil separately) to eliminate air pockets and floating debris. Starting with damp soil helps reduce cloudiness when you fill the tank.
- Patience for Cycling: Resist the urge to add fish or shrimp right away. Give the tank time to cycle fully – at least a few weeks – so that ammonia and nitrite levels drop to zero. This ensures a safe, established environment for your aquatic pets.